Search Results: "rmb"

18 July 2020

Abhijith PA: Workstation setup

Workstation Hello, Recently I ve seen lot of people sharing about their home office setup. I thought why don t I do something similar. Not to beat FOMO, but in future when I revisit this blog, it will be lovely to understand that I had some cool stuffs. There are people who went deep down in the ocean to lay cables for me to have a remote job and I am thankful to them. 
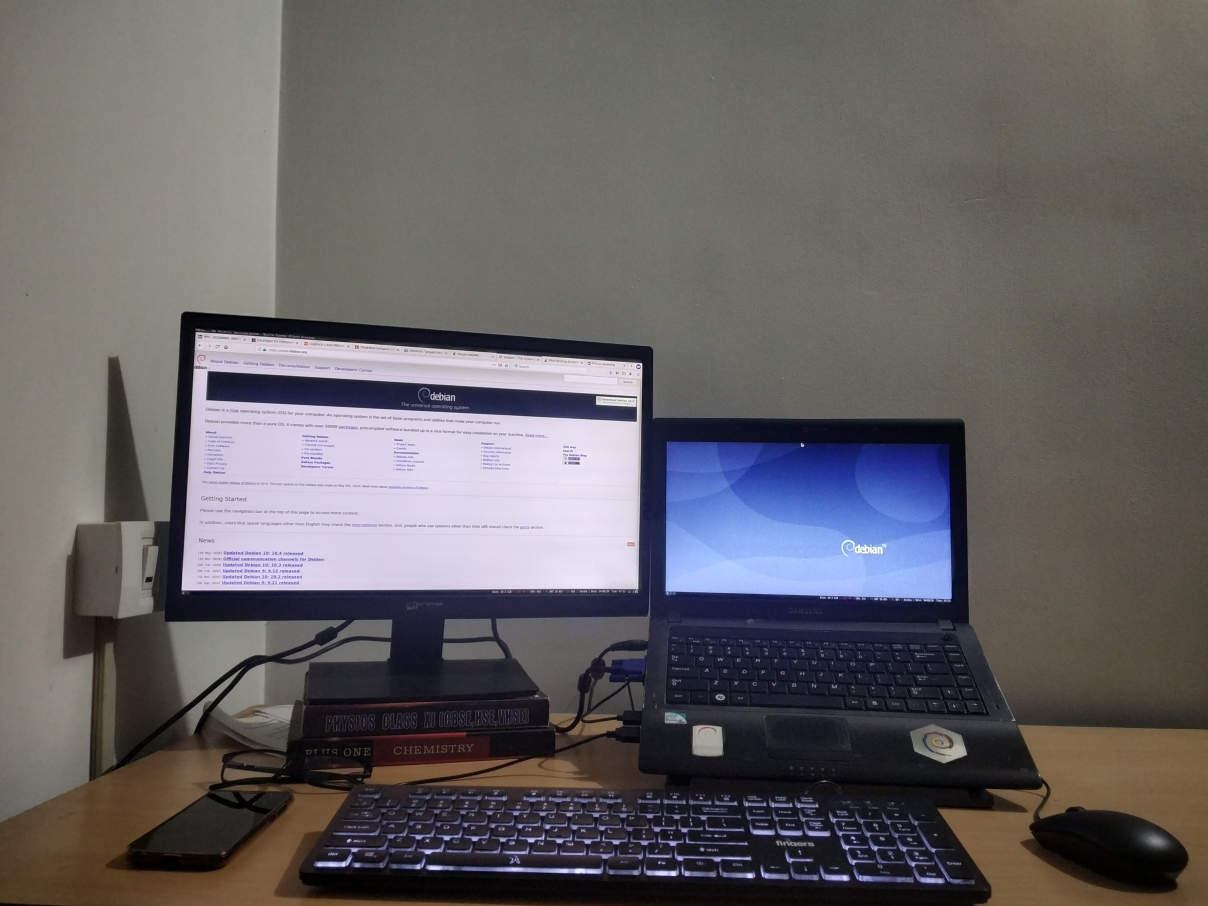
Being remote my home is my office. On my work table I have a Samsung R439 laptop. I ve blogged about it earlier. New addition is that it have another 4GB RAM, a total of 6GB and 120GB SSD. I run Debian testing on it. Laptop is placed on a stand. Dell MS116 as external mouse always connected to it. I also use an external keyboard from fingers. The keys are very stiff so I don t recommend this to anyone. The only reason I took this keyboard that it is in my budget and have a backlit, which I needed most. I have a Micromax MM215FH76 21 inch monitor as my secondary display which stacked up on couple of old books to adjust the height with laptop stand. Everything is ok with this monitor except that it don t have a HDMI point and stand is very weak. I use i3wm and this small script help me to manage my monitor arrangement.
# samsung r439
xrandr --output LVDS1 --primary --mode 1366x768 --pos 1920x312 --rotate normal --output DP1 --off --output HDMI1 --off --output VGA1 --mode 1920x1080 --pos 0x0 --rotate normal --output VIRTUAL1 --off
# thinkpad t430s
#xrandr --output LVDS1 --primary --mode 1600x900 --pos 1920x180 --rotate normal --output DP1 --off --output DP2 --off --output DP3 --off --output HDMI1 --off --output HDMI2 --off --output HDMI3 --off --output VGA1 --mode 1920x1080 --pos 0x0 --rotate normal --output VIRTUAL1 --off
i3-msg workspace 2, move workspace to left
i3-msg workspace 4, move workspace to left
i3-msg workspace 6, move workspace to left
I also have another Viewsonic monitor 19 inch, it started to show some lines and unpleasant colors. Thus moved back to shelf. I have an orange pi zero plus 2 running Armbian which serve as my emby media server. I don t own any webcam or quality headset at the moment. I have a boat, and Mi, headphones. My laptop inbuilt webcam is horrible, so for my video conferencing need I use jitsi app on my mobile device.

17 July 2020

Sven Hoexter: Debian and exFAT

As some might have noticed we now have Linux 5.7 in Debian/unstable and subsequently the in kernel exFAT implementation created by Samsung available. Thus we now have two exFAT implementations, the exfat fuse driver and the Linux based one. Since some comments and mails I received showed minor confusions, especially around the available tooling, it might help to clarify a bit what is required when. Using the Samsung Linux Kernel Implementation Probably the most common use case is that you just want to use the in kernel implementation. Easy, install a Linux 5.7 kernel package for your architecture and either remove the exfat-fuse package or make sure you've version 1.3.0-2 or later installed. Then you can just run mount /dev/sdX /mnt and everything should be fine. Your result will look something like this:
$ mount grep sdb
/dev/sdb on /mnt type exfat (rw,relatime,fmask=0022,dmask=0022,iocharset=utf8,errors=remount-ro
In the past this basic mount invocation utilized the mount.exfat helper, which was just a symlink to the helper which is shipped as /sbin/mount.exfat-fuse. The link was dropped from the package in 1.3.0-2. If you're running a not so standard setup, and would like to keep an older version of exfat-fuse installed you must invoke mount -i to prevent mount from loading any helper to mount the filesystem. See also man 8 mount. For those who care, mstone@ and myself had a brief discussion about this issue in #963752, which quickly brought me to the conclusion that it's in the best interest of a majority of users to just drop the symlink from the package. Sticking to the Fuse Driver If you would like to stick to the fuse driver you can of course just do it. I plan to continue to maintain all packages for the moment. Just keep the exfat-fuse package installed and use the mount.exfat-fuse helper directly. E.g.
$ sudo mount.exfat-fuse /dev/sdb /mnt
FUSE exfat 1.3.0
$ mount grep sdb
/dev/sdb on /mnt type fuseblk (rw,nosuid,nodev,relatime,user_id=0,group_id=0,default_permissions,allow_other,blksize=4096)
In case this is something you would like to make permanent, I would recommend that you create yourself a mount.exfat symlink pointing at the mount.exfat-fuse helper. mkfs and fsck - exfat-utils vs exfatprogs Beside of the filesystem access itself we now also have two implementations of tooling, which support filesystem creation, fscking and label adjustment. The older one is exfat-utils by the creator of the fuse driver, which is also part of Debian since the fuse driver was packaged in 2012. New in Debian is the exfatprogs package written by the Samsung engineers. And here the situation starts to get a bit more complicated. Both packages ship a mkfs.exfat and fsck.exfat tool, so we can not co-install them. In the end both packages declare a conflict with each other at the moment. As outlined in this thread I do not plan to overcomplicate the situation by using the alternatives system. I do feel strongly that this would just create more confusion without a real benefit. Since the tools do not have matching cli options, that could also cause additional issues and confusion. I plan to keep that as is, at least for the bullseye release. Afterwards it's possible, depending on how the usage evolves, to drop the mkfs.exfat and fsck.exfat from exfat-utils, they are in fact again only symlinks. pain point might be tools interfacing with the differing implementations. Currently I see only three reverse depedencies, so that should be manageable to consolidate if required. Last but not least it might be relevant to mention that the exfat-utils package also contains a dumpexfat tool which could be helpful if you're more into forensics, or looking into other lower level analysis of an exFAT filsystem. Thus there is a bit of an interest to have those tools co-installed in some - I would say - niche cases. buster-backports Well if you use buster with a backports kernel you're a bit on your own. In case you want to keep the fuse driver installed, but would still like to mount, e.g. for testing, with the kernel exFAT driver, you must use mount -i. I do not plan any uploads to buster-backports. If you need a mkfs.exfat on buster, I would recommend to just use the one from exfat-utils for now. It has been good enough for the past years, should not get sour before the bullseye release, which ships exfatprogs for you. Kudos My sincere kudos go to:

18 June 2020

Enrico Zini: Missing Qt5 designer library in cross-build development

This is part of a series of posts on compiling a custom version of Qt5 in order to develop for both amd64 and a Raspberry Pi. The problem While testing the cross-compiler, we noticed that the designer library was not being built. The designer library is needed to build designer plugins, which allow loading, dynamically at runtime, .ui interface files that use custom widgets. The error the customer got at runtime is: QFormBuilder was unable to create a custom widget of the class ' '; defaulting to base class 'QWidget'. The library with the custom widget implementation was correctly linked, and indeed the same custom widget was used by the application in other parts of its interface not loaded via .ui files. It turns out that it is not sufficient, and to load custom widgets automatically, QUiLoader wants to read their metadata from plugin libraries containing objects that implement the QDesignerCustomWidgetInterface interface. Sadly, building such a library requires using QT += designer, and the designer library, that was not being built by Qt5's build system. This looks very much like a Qt5 bug. A work around would be to subclass QUiLoader extending createWidget to teach it how to create the custom widgets we need. Unfortunately, the customer has many custom widgets. The investigation To find out why designer was not being built, I added -d to the qmake invocation at the end of qtbase/configure, and trawled through the 3.1G build output. The needle in the haystack seems to be here:
DEBUG 1: /home/build/armhf/qt-everywhere-src-5.15.0/qttools/src/designer/src/src.pro:18: SUBDIRS := uiplugin uitools lib components designer plugins
DEBUG 1: /home/build/armhf/qt-everywhere-src-5.15.0/qttools/src/designer/src/src.pro:23: calling qtNomakeTools(lib components designer plugins)
As far as I can understand, qtNomakeTools seems to be intended to disable building those components if QT_BUILD_PARTS doesn't contain tools. For cross-building, QT_BUILD_PARTS is libs examples, so designer does not get built. However, designer contains the library part needed for QDesignerCustomWidgetInterface and that really needs to be built. I assume that part should really be built as part of libs, not tools. The fixes/workarounds I tried removing designer from the qtNomakeTools invocation at qttools/src/designer/src/src.pro:23, to see if qttools/src/designer/src/designer/ would get built. It did get built, but then build failed with designer/src/designer and designer/src/uitools both claiming the designer plugin. I tried editing qttools/src/designer/src/uitools/uitools.pro not to claim the designer plugin when tools is not a build part. I added the tweaks to the Qt5 build system as debian/patches. 2 hours of build time later... make check is broken:
make[6]: Leaving directory '/home/build/armhf/qt-everywhere-src-5.15.0/qttools/src/designer/src/uitools'
make[5]: *** No rule to make target 'sub-components-check', needed by 'sub-designer-check'.  Stop.
But since make check doesn't do anything in this build, we can simply override dh_auto_test to skip that step. Finally, this patch builds a new executable, of an architecture that makes dh_shlibdeps struggle:
dpkg-shlibdeps: error: cannot find library libQt5DesignerComponentssystem.so.5 needed by debian/qtbase5system-armhf-dev/opt/qt5system-armhf/bin/designer (ELF format: 'elf32-little' abi: '0101002800000000'; RPATH: '')
dpkg-shlibdeps: error: cannot find library libQt5Designersystem.so.5 needed by debian/qtbase5system-armhf-dev/opt/qt5system-armhf/bin/designer (ELF format: 'elf32-little' abi: '0101002800000000'; RPATH: '')
 
And we can just skip running dh_shlibdeps on the designer executable. The result is in the qt5custom git repository.

16 May 2020

Sven Hoexter: Quick and Dirty: masquerading / NAT with nftables

Since nftables is now the new default, a short note to myself on how to setup masquerading, like the usual NAT setup you use on a gateway.
nft add table nat
nft add chain nat postrouting   type nat hook postrouting priority 100 \;  
nft add rule nat postrouting ip saddr 192.168.1.0/24 oif wlan0 masquerade
In this case the wlan0 is basically the "WAN" interface, because I use an old netbook as a wired to wireless network adapter.

19 April 2020

Sven Hoexter: Emulating Raspi2 like hardware with Rasbian in 2020

To follow some older (as in two years) ARM assembler howto, I searched for a quick and dirty way to run a current Rasbian with qemu 4.2 on Debian/unstable. The end result are the following notes to get that up and running:
# Download a binary device tree file and matching kernel a good soul uploaded to github
wget https://github.com/vfdev-5/qemu-rpi2-vexpress/raw/master/kernel-qemu-4.4.1-vexpress
wget https://github.com/vfdev-5/qemu-rpi2-vexpress/raw/master/vexpress-v2p-ca15-tc1.dtb
# Download the official Rasbian image without X
wget -O raspbian_lite_latest.zip https://downloads.raspberrypi.org/raspbian_lite_latest
unzip raspbian_lite_latest.zip
# Convert it from the raw image to a qcow2 image and add some space
qemu-img convert -f raw -O qcow2 2020-02-13-raspbian-buster-lite.img rasbian.qcow2
qemu-img resize rasbian.qcow2 +2G
# start qemu
qemu-system-arm -m 2048M -M vexpress-a15 -cpu cortex-a15 \
 -kernel kernel-qemu-4.4.1-vexpress -no-reboot \
 -smp 2 -serial stdio \
 -dtb vexpress-v2p-ca15-tc1.dtb -sd rasbian.qcow2 \
 -append "root=/dev/mmcblk0p2 rw rootfstype=ext4 console=ttyAMA0,15200 loglevel=8" \
 -nic user,hostfwd=tcp::5555-:22
# login at the serial console as user pi with password raspberry
sudo -i
# enable ssh
systemctl enable ssh
# resize partition and filesystem
parted /dev/mmcblk0 resizepart 2 100%
resize2fs /dev/mmcblk0p2
Now I can login via ssh and start to play:
ssh pi@localhost -p 5555
So for me that is sufficient, I have network connectivity to install an editor, transfer files and can otherwise work with tmux to have some session multiplexing. Additional Notes

2 April 2020

Sven Hoexter: New TLDs and Automatic link detection was a bad idea

Update: Seems this is a Firefox specific bug in the Slack Webapplication, it works in Chrome and the Slack Electron Application as it should. Tested with Firefox ESR on Debian/buster and Firefox 74 on OS X. Ah I like it that we now have so many TLDs and matching on those seems to go bad more often now. Last occassion is Slack (which I think is a pile of shit written by morons, but that is a different story) which somehow does not properly match on .co domains. Leading to this auto linking: nsswitch.conf link Now I'm not sure if someone enocountered the same issue, or people just registered random domains just because they could. I found registrations for I've a few more .conf files in /etc which could be interesting in an IT environment, but for the sake of playing with it I registered nsswitch.co at godaddy. I do not want to endorse them in anyway, but for the first year it's only 13.08EUR right now, which is okay to pay for a stupid demo. So if you feel like it, you can probably register something stupid for yourself to play around with. I do not intent to renew this domain next year, so be aware of what happens then with the next owner.

29 March 2020

Sven Hoexter: Looking into Envertech Enverbridge EVB 202 SetID tool

Disclaimer: I'm neither an experienced programmer nor proficient in reverse engineering, but I like at least to try to figure out how things work. Sometimes the solution is so easy, that even I manage to find it, still take this with a grain of salt. I lately witnessed the setup of an Envertech EnverBridge ENB-202 which is kind of a classic Chinese IoT device. Buy it, plug it in, use some strange setup software, and it will report your PV statistics to a web portal. The setup involved downloading a PE32 Windows executable, with an UI that basically has two input boxes and a sent button. You've to input the serial number(s) of your inverter boxes and the ID of your EnverBridge. That made me interested in what this setup process really looks like. The EnverBridge device itself has on one end a power plug, which is also used to communicate with the inverter via some Powerline protocol, and a network plug with a classic RJ45 end you plug into your network. If you power it up it will request an IPv4 address via DHCP. That brings us to the first oddity, the MAC address is in the BC:20:90 prefix which I could not find in the IEEE lists. Setting Up the SetID Software You can download the Windows software in a Zipfile, once you unpack it you end up with a Nullsoft installer .exe. Since this is a PE32 executable we've to add i386 as foreign architecture to install the wine32 package.
dpkg --add-architecture i386
apt update
apt install wine32:i386
wget http://www.envertec.com/uploads/bigfiles/Set%20ID.zip
unzip Set\ ID.zip
wine Set\ ID.exe
The end result is an installation in ~/.wine/drive_c/Program Files/SetID which reveals that this software is build with Qt5 according to the shipped dll's. The tool itself is in udpCilentNow.exe, and looks like this: Envertech SetID software The Network Communication To my own surprise, the communication is straight forward. A single UDP paket is sent to the broadcast address (255.255.255.255) on port 8765. Envertech SetID udp paket in wireshark 
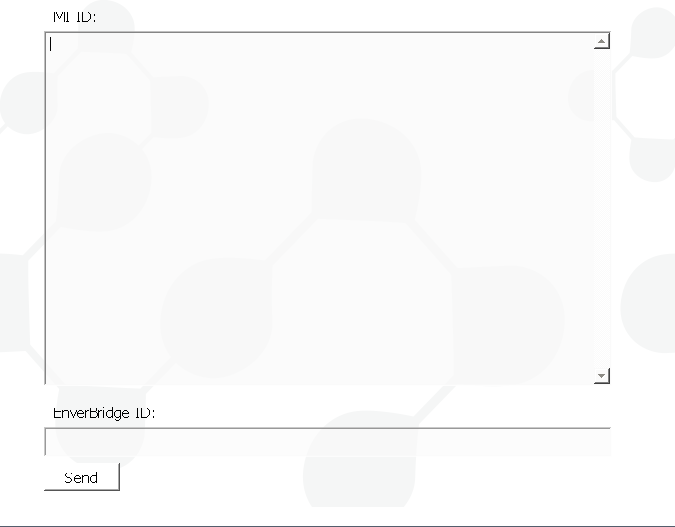
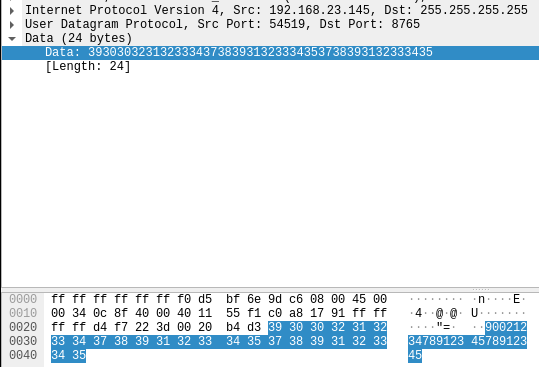
I expected some strange binary protocol, but the payload is just simple numbers. They're a combination of the serial numbers of the inverter and the ID of the Enverbridge device. One thing I'm not 100% sure about are the inverter serial numbers, there are two of them, but on the inverter I've seen the serial numbers are always the same. So the payload is assembled like this: If you've more inverter the serials are just appended in the same way. Another strange thing is that the software does close to no input validation, they only check that the inverter serials start with CN and then just extract char 9 to 16. The response from the EnverBridge is also a single UDP paket to the broadcast address on port 8764, with exactly the same content we've sent. Writing a Replacement My result is probably an insult for all proficient Python coders, but based on a bit of research and some cut&paste programming I could assemble a small script to replicate the function of the Windows binary. I guess the usefulness of this exercise was mostly my personal entertainment, though it might help some none Windows users to setup this device. Usage is also very simple:
./enverbridge.py -h
Usage: enverbridge.py [options] MIIDs
Options:
  -h, --help         show this help message and exit
  -b BID, --bid=BID  Serial Number of your EnverBridge
./enverbridge.py -b 90087654 CN19100912345678 CN19100912345679
This is basically 1:1 the behaviour of the Windows binary, though I tried to add a bit more validation then the original binary and some more error messages. I also assume the serial numbers are also always the same so I take only one as the input, and duplicate it for the paket data.

12 November 2017

Sven Hoexter: Offering a Simtec Entropy Key

Since I started to lean a bit towards the concept of minimalism I've got rid of stuff, including all stationary computers. So for now I'm left with just my laptop and that's something where I do not want to attach an USB entropy key permanently. That's why I've a spare Simtec Entropy Key I no longer use, and I'm willing to sell. In case someone is interested, I'm willing to give it away for 20EUR + shipping. If you can convince me it'll be of use for the Debian project (end up on a DSA managed machine for example) I'm willing to give it away for less. If you're located in Cologne, Copenhagen or Barcelona we might be able, depending on the timing, to do a personal handover (with or without keysigning). Otherwise I guess shipping is mainly interesting for someone also located in Europe. You can use sven at stormbind dot net or hoexter at debian dot org to contact me and use GPG key 0xA6DC24D9DA2493D1.

29 September 2017

Sven Hoexter: Last rites to the lyx and elyxer packaging

After having been a heavy LyX user from 2005 to 2010 I've continued to maintain LyX more or less till now. Finally I'm starting to leave that stage and removed myself from the Uploaders list. The upload with some other last packaging changes is currently sitting in the git repo. Mainly because lintian on ftp-master currently rejects 'pakagename@packages.d.o' maintainer addresses (the alternative to the lists.alioth.d.o maintainer mailinglists). For elyxer I filled a request for removal. It hasn't seen any upstream activity for a while and the LyX build in HTML export support improved. My hope is that if I step away far enough someone else might actually pick it up. I had this strange moment when I lately realized that xchat got reintroduced to Debian after mapreri and myself spent some time last year to get it removed before the stretch release.

8 September 2017

Sven Hoexter: munin with TLS

Primarily a note for my future self so I don't have to find out what I did in the past once more. If you're running some smaller systems scattered around the internet, without connecting them with a VPN, you might want your munin master and nodes to communicate with TLS and validate certificates. If you remember what to do it's a rather simple and straight forward process. To manage the PKI I'll utilize the well known easyrsa script collection. For this special purpose CA I'll go with a flat layout. So it's one root certificate issuing all server and client certificates directly. Some very basic docs can be also found in the munin wiki. master setup For your '/etc/munin/munin.conf':
tls paranoid
tls_verify_certificate yes
tls_private_key /etc/munin/master.key
tls_certificate /etc/munin/master.crt
tls_ca_certificate /etc/munin/ca.crt
tls_verify_depth 1
A node entry with TLS will look like this:
[node1.stormbind.net]
    address [2001:db8::]
    use_node_name yes
Important points here: For easy-rsa the following command invocations are relevant:
./easyrsa init-pki
./easyrsa build-ca
./easrsa gen-req master
./easyrsa sign-req client master
./easyrsa set-rsa-pass master nopass
node setup For your '/etc/munin/munin-node.conf':
tls paranoid
tls_verify_certificate yes
tls_private_key /etc/munin/node1.key
tls_certificate /etc/munin/node1.crt
tls_ca_certificate /etc/munin/ca.crt
tls_verify_depth 1
For easy-rsa the following command invocations are relevant:
./easyrsa gen-req node1
./easyrsa sign-req server node1
./easyrsa set-rsa-pass node1 nopass
Important points here:

22 August 2017

Sven Hoexter: whois databases and registration spam

Lately I experienced some new kind of spam, at least new to myself. Seems that spammer abuse registration input fields that do not implement strong enough validation, and echo back several values from the registration process in some kind of welcome mail. Basically filling the spam message in name and surname fields. So far I found a bunch of those originating from the following AS: AS49453, AS50896, AS200557 and AS61440. The first three belong to something identifying itself as "QUALITYNETWORK". The last one, AS61440, seems to be involved only partially with some networks being delegated to "Atomohost". To block them it's helpful to query the public radb service whois.radb.net for all networks belonging to the specific AS like this:
whois -h whois.radb.net -- '-i origin AS50896'
Another bunch of batch capable whois services are provided by Team Cymru. They've some examples at the end of https://www.team-cymru.org/IP-ASN-mapping.html. In this specific case the spam was for "www.robotas.ru" which is currently terminated at CloudFlare and redirects via JS document.location to "http://link31.net/b494d/ooo/", which in turn redirects via JS window.location to "http://revizor-online.ga/" which is again hosted at CloudFlare. The page at the end plays some strange youtube video - currently at around 1900 plays, so not that widely spread. In the end an interesting indicator about spam campaign success.

12 July 2017

Sven Hoexter: environment variable names with dots and busybox 1.26.0 ash

In case you're for example using Alpine Linux 3.6 based docker images, and you've been passing through environment variable names with dots, you might miss them now in your actual environment. It seems that with busybox 1.26.0 the busybox ash got a lot stricter regarding validation of environment variable names and now you can no longer pass through variable names with dots in them. They just won't be there. If you've been running ash interactively you could not add them in the past, but until now you could do something like this in your Dockerfile
ENV foo.bar=baz
and later on accces a variable "foo.bar". bash still allows those invalid variable names and is way more tolerant. So to be nice to your devs, and still bump your docker image version, you can add bash and ensure you're starting your application with /bin/bash instead of /bin/sh inside of your container. Links

12 June 2017

Sven Hoexter: UEFI PXE preseeded Debian installation on HPE DL120

We bought a bunch of very cheap low end HPE DL120 server. Enough to warrant a completely automated installation setup. Shouldn't be that much of a deal, right? Get dnsmasq up and running, feed it a preseed.cfg and be done with it. In practise it took us more hours then we expected. Setting up the hardware Our hosts are equipped with an additional 10G dual port NIC and we'd like to use this NIC for PXE booting. That's possible, but it requires you to switch to UEFI boot. Actually it enables you to boot from any available NIC. Setting up dnsmasq We decided to just use the packaged debian-installer from jessie and do some ugly things like overwritting files in /usr/lib via ansible later on. So first of all install debian-installer-8-netboot-amd64 and dnsmasq, then enroll our additional config for dnsmasq, ours looks like this:
domain=int.foobar.example
dhcp-range=192.168.0.240,192.168.0.242,255.255.255.0,1h
dhcp-boot=bootnetx64.efi
pxe-service=X86-64_EFI, "Boot UEFI PXE-64", bootnetx64.efi
enable-tftp
tftp-root=/usr/lib/debian-installer/images/8/amd64/text
dhcp-option=3,192.168.0.1
dhcp-host=00:c0:ff:ee:00:01,192.168.0.123,foobar-01
Now you've to link /usr/lib/debian-installer/images/8/amd64/text/bootnetx64.efi to /usr/lib/debian-installer/images/8/amd64/text/debian-installer/amd64/bootnetx64.efi. That got us of the ground and we had a working UEFI PXE boot that got us into debian-installer. Feeding d-i the preseed file Next we added some grub.cfg settings and parameterized some basic stuff to be handed over to d-i via the kernel command line. You'll find the correct grub.cfg in /usr/lib/debian-installer/images/8/amd64/text/debian-installer/amd64/grub/grub.cfg. We added the following two lines to automate the start of the installer:
set default="0"
set timeout=5
and our kernel command line looks like this:
 linux    /debian-installer/amd64/linux vga=788 --- auto=true interface=eth1 netcfg/dhcp_timeout=60 netcfg/choose_interface=eth1 priority=critical preseed/url=tftp://192.168.0.2/preseed.cfg quiet
Important points: preseeed.cfg, GPT and ESP One of the most painful points was the fight to find out the correct preseed values to install with GPT to create a ESP (EFI system partition) and use LVM for /. Relevant settings are:
# auto method must be lvm
d-i partman-auto/method string lvm
d-i partman-lvm/device_remove_lvm boolean true
d-i partman-md/device_remove_md boolean true
d-i partman-lvm/confirm boolean true
d-i partman-lvm/confirm_nooverwrite boolean true
d-i partman-basicfilesystems/no_swap boolean false
# Keep that one set to true so we end up with a UEFI enabled
# system. If set to false, /var/lib/partman/uefi_ignore will be touched
d-i partman-efi/non_efi_system boolean true
# enforce usage of GPT - a must have to use EFI!
d-i partman-basicfilesystems/choose_label string gpt
d-i partman-basicfilesystems/default_label string gpt
d-i partman-partitioning/choose_label string gpt
d-i partman-partitioning/default_label string gpt
d-i partman/choose_label string gpt
d-i partman/default_label string gpt
d-i partman-auto/choose_recipe select boot-root-all
d-i partman-auto/expert_recipe string \
boot-root-all :: \
538 538 1075 free \
$iflabel  gpt   \
$reusemethod    \
method  efi   \
format    \
. \
128 512 256 ext2 \
$defaultignore    \
method  format   format    \
use_filesystem    filesystem  ext2   \
mountpoint  /boot   \
. \
1024 4096 15360 ext4 \
$lvmok    \
method  format   format    \
use_filesystem    filesystem  ext4   \
mountpoint  /   \
. \
1024 4096 15360 ext4 \
$lvmok    \
method  format   format    \
use_filesystem    filesystem  ext4   \
mountpoint  /var   \
. \
1024 1024 -1 ext4 \
$lvmok    \
method  format   format    \
use_filesystem    filesystem  ext4   \
mountpoint  /var/lib   \
.
# This makes partman automatically partition without confirmation, provided
# that you told it what to do using one of the methods above.
d-i partman-partitioning/confirm_write_new_label boolean true
d-i partman/choose_partition select finish
d-i partman-md/confirm boolean true
d-i partman/confirm boolean true
d-i partman/confirm_nooverwrite boolean true
# This is fairly safe to set, it makes grub install automatically to the MBR
# if no other operating system is detected on the machine.
d-i grub-installer/only_debian boolean true
d-i grub-installer/with_other_os boolean true
d-i grub-installer/bootdev  string /dev/sda
I hope that helps to ease the processes to setup automated UEFI PXE installations for some other people out there still dealing with bare metal systems. Some settings took us some time to figure out, for example d-i partman-efi/non_efi_system boolean true required some searching on codesearch.d.n (amazing ressource if you're writing preseed files and need to find the correct templates) and reading scripts on git.d.o where you'll find the source for partman-* and grub-installer. Kudos Thanks especially to P.P. and M.K. to figure out all those details.

26 April 2017

Sven Hoexter: Chrome 58 ignores commonName in certificates

People using Chrome might have already noticed that some internal certificates created without a SubjectAlternativeName extension fail to verify. Finally the Google Chrome team stepped forward, and after only 17 years of having SubjectAlternativeName as the place for FQDNs to verify as valid for a certificate, they started to ignore the commonName. See also https://www.chromestatus.com/feature/4981025180483584. Currently Debian/stretch still has Chromium 57 but Chromium 58 is already in unstable. So some more people might notice this change soon. I hope that everyone who maintains some broken internal scripting to maintain internal CAs now re-reads the OpenSSL Cookbook to finally fix this stuff. In general I recommend to base your internal CA scripting on easy-rsa to avoid making every mistake in certificate management on your own.

1 March 2017

Paul Wise: FLOSS Activities February 2017

Changes

Issues

Review

Administration
  • Debian: do the samhain dance, ask for new local contacts at one site, ask local admins to reset one machine, powercycle 2 dead machines, redirect 1 user to the support channels, redirect 1 user to a service admin, redirect 1 spam reporter to the right mechanisms, investigate mail logs for a missing bug report, ping bugs-search.d.o service admin about moving off glinka and remove data, poke cdimage-search.d.o service admin about moving off glinka, update a cron job on denis.d.o for the rename of letsencrypt.sh to dehydrated, debug planet.d.o issue and remove stray cron job lock file, check if ftp is used on a couple of security.d.o mirrors, discuss storage upgrade for LeaseWeb for snapshot.d.o/deriv.d.n/etc, investigate SSD SMART error and ignore the unknown attribute, ask 9 users to restart their processes, investigate apt-get update failure in nagios, swapoff/swapon a swap file to drain it, restart/disable some failed services, help restore the backup server, debug stretch /dev/log issue,
  • Debian QA: deploy merged PTS/tracker patches,
  • Debian wiki: answer 1 IP-blocked VPN user, pinged 1 user on IRC about their bouncing mail, disabled 4 accounts due to bouncing mail, redirect 1 person to documentation/lists, whitelist 5 email addresses, forward 1 password reset token, killed 1 spammer account, reverted 1 spammer edit,
  • Debian mentors: security upgrades, check which email a user signed up with
  • Openmoko: security upgrades, daemon restarts, reboot

Debian derivatives
  • Turned off the census cron job because it ran out of disk space
  • Update Armbian sources.list
  • Ping siduction folks about updating their sources.list
  • Start a discussion about DebConf17
  • Notify the derivatives based on jessie or older that stretch is frozen
  • Invite Rebellin Linux (again)

Sponsors The libesedb Debian backport was sponsored by my employer. All other work was done on a volunteer basis.

24 February 2017

Sven Hoexter: Tcl and https - back to TclCurl

Must be the irony of life that I was about to give up the TclCurl Debian package some time ago, and now I'm using it again for some very old and horrible web scraping code. The world moved on to https but the Tcl http package only supports unencrypted http. You can combine it with the tls package as explained in the Wiki, but that seems to be overly complicated compared to just loading the TclCurl binding and moving on with something like this:
package require TclCurl
# download to a variable
curl::transfer -url https://sven.stormbind.net -bodyvar page
# or store it in a file
curl::transfer -url https://sven.stormbind.net -file page.html
Now the remaining problem is that the code is unmaintained upstream and there is one codebase on bitbucket and one on github. While I fed patches to the bitbucket repo and thus based the Debian package on that repo, the github repo diverted in a different direction.

14 February 2017

Sven Hoexter: moto g falcon up and running with LineageOS 14.1 nightly

After a few weeks of running Exodus on my moto g falcon, I've now done again the full wipe and moved on to LineageOS nightly from 20170213. Though that build is no longer online at the moment. It's running smooth so far for myself but there was an issue with the Google Play edition of the phone according to Reddit. Since I don't use gapps anyway I don't care. The only issue I see so far is that I can not reach the flash menu in the camera app. It's hidden behind a grey bar. Not nice but not a show stopper for me either.

9 February 2017

Sven Hoexter: Limit host access based on LDAP groupOfUniqueNames with sssd

For CentOS 4 to CentOS 6 we used pam_ldap to restrict host access to machines, based on groupOfUniqueNames listed in an openldap. With RHEL/CentOS 6 RedHat already deprecated pam_ldap and highly recommended to use sssd instead, and with RHEL/CentOS 7 they finally removed pam_ldap from the distribution. Since pam_ldap supported groupOfUniqueNames to restrict logins a bigger collection of groupOfUniqueNames were created to restrict access to all kind of groups/projects and so on. But sssd is in general only able to filter based on an "ldap_access_filter" or use the host attribute via "ldap_user_authorized_host". That does not allow the use of "groupOfUniqueNames". So to allow a smoth migration I had to configure sssd in some way to still support groupOfUniqueNames. The configuration I ended up with looks like this:
[domain/hostacl]
autofs_provider = none 
ldap_schema = rfc2307bis
# to work properly we've to keep the search_base at the highest level
ldap_search_base = ou=foo,ou=people,o=myorg
ldap_default_bind_dn = cn=ro,ou=ldapaccounts,ou=foo,ou=people,o=myorg
ldap_default_authtok = foobar
id_provider = ldap
auth_provider = ldap
chpass_provider = none
ldap_uri = ldaps://ldapserver:636
ldap_id_use_start_tls = false
cache_credentials = false
ldap_tls_cacertdir = /etc/pki/tls/certs
ldap_tls_cacert = /etc/pki/tls/certs/ca-bundle.crt
ldap_tls_reqcert = allow
ldap_group_object_class = groupOfUniqueNames
ldap_group_member = uniqueMember
access_provider = simple
simple_allow_groups = fraappmgmtt
[sssd]
domains = hostacl
services = nss, pam
config_file_version = 2
Important side note: With current sssd versions you're more or less forced to use ldaps with a validating CA chain, though hostnames are not required to match the CN/SAN so far. Relevant are: In practise what we do is match the member of the groupOfUniqueNames to the sssd internal group representation. The best explanation about the several possible object classes in LDAP for group representation I've found so far is unfortunately in a german blog post. Another explanation is in the LDAP wiki. In short: within a groupOfUniqueNames you'll find a full DN, while in a posixGroup you usually find login names. Different kind of object class requires a different handling. Next step would be to move auth and nss functionality to sssd as well.

7 February 2017

Sven Hoexter: Dell Latitude E7470 hold and mark with upper left touchpad button

Recently some of my coworkers and I experienced an issue with using the upper left touchpad button on our Dell Latitude E7470 and similar laptops (E5xxx from the current generation). Some time in January we could no longer hold down this button and select text with the touchpad. Using the left button below the touchpad still worked. This hit my coworker running Fedora and myself running Debian/stretch. So I first thought that it's likely a libinput issue (same version in Debian/stretch and Fedora and I recently pulled that in as an update), somehow blacklisting the upper left key because it's connected to the trackpoint. So I filled #99594 upstream. While this was not very helpful at first, and according to Peter very unlikely to be related to libinput, another coworker using Debian/jessie found this issue to hit him when he upgraded the backports kernel in use from 4.8 to 4.9. That finally led to the conclusion that it's a bug in the Linux alps driver, which is already fixed in 4.10 and probably 4.9.6. Until the Debian kernel team pulls in a fresh 4.9 point release I'm using 4.10-rc6 from experimental. For Debian/jessie + backports kernel user it might be more convenient to just stay at 4.8 in case this issue annoys you. Kudos to Peter, Benjamin, TW and WW for the help in locating the origin of this issue! Lessons learned:

3 February 2017

Sven Hoexter: chromium --enable-remote-extensions

From time to time I've to use chromium for creepy stuff like lifesize video conferencing with document sharing. The document sharing requires a chromium extension. Suddenly that stopped working today and I could not reinstall the extension. After trying a lot of stuff I had a look at the debian changelog and found out about:
chromium --enable-remote-extensions
See also #851927.

Next.

Previous.